
The master data behind the GDPR ToolBox
Personal data only get a retention date and a planned action if you first tell the app which tables hold them and what should happen with them. The master data of the GDPR ToolBox do that: a record type carries the protection class, the protection level, how long data may be kept and whether they are deleted or anonymized; the table guideline for each table copies those values and may override them; and the setup lists - collection reasons, data source codes, verification codes, reschedule reasons, processing purposes and consents - are what users pick from in their everyday work. Julia Beyer, the IT administrator at QUALIA Technik, sets these lists up once before Max Keller starts recording tenants such as Tanja Weiss and Lena Hartmann receives the first request from a data subject. Lena Hartmann uses the results directly: the verification code that documents how she checked Tanja's identity comes from Verification Codes, and the processing purposes that Tanja's e-mail consent grants are defined here too.
Before you start
- Julia Beyer, the IT administrator (Setup), maintains these lists; Lena Hartmann and Max Keller only use the codes.
- Fill in the single GDPR Setup record first: its request status codes and Request No. Series control the rest of the app, and a new table guideline copies Reschedule Actions from it.
- Note down which tables hold personal data. At QUALIA Technik these are Contact, Customer, Sales Header and Posted Sales Invoice. Standard Business Central needs no setup for the lists themselves.
- Decide the two values a table guideline always needs together: how long the data may be kept (for example 5Y for five years) and what happens then (delete or anonymize).
Create record types with their protection classes and levels
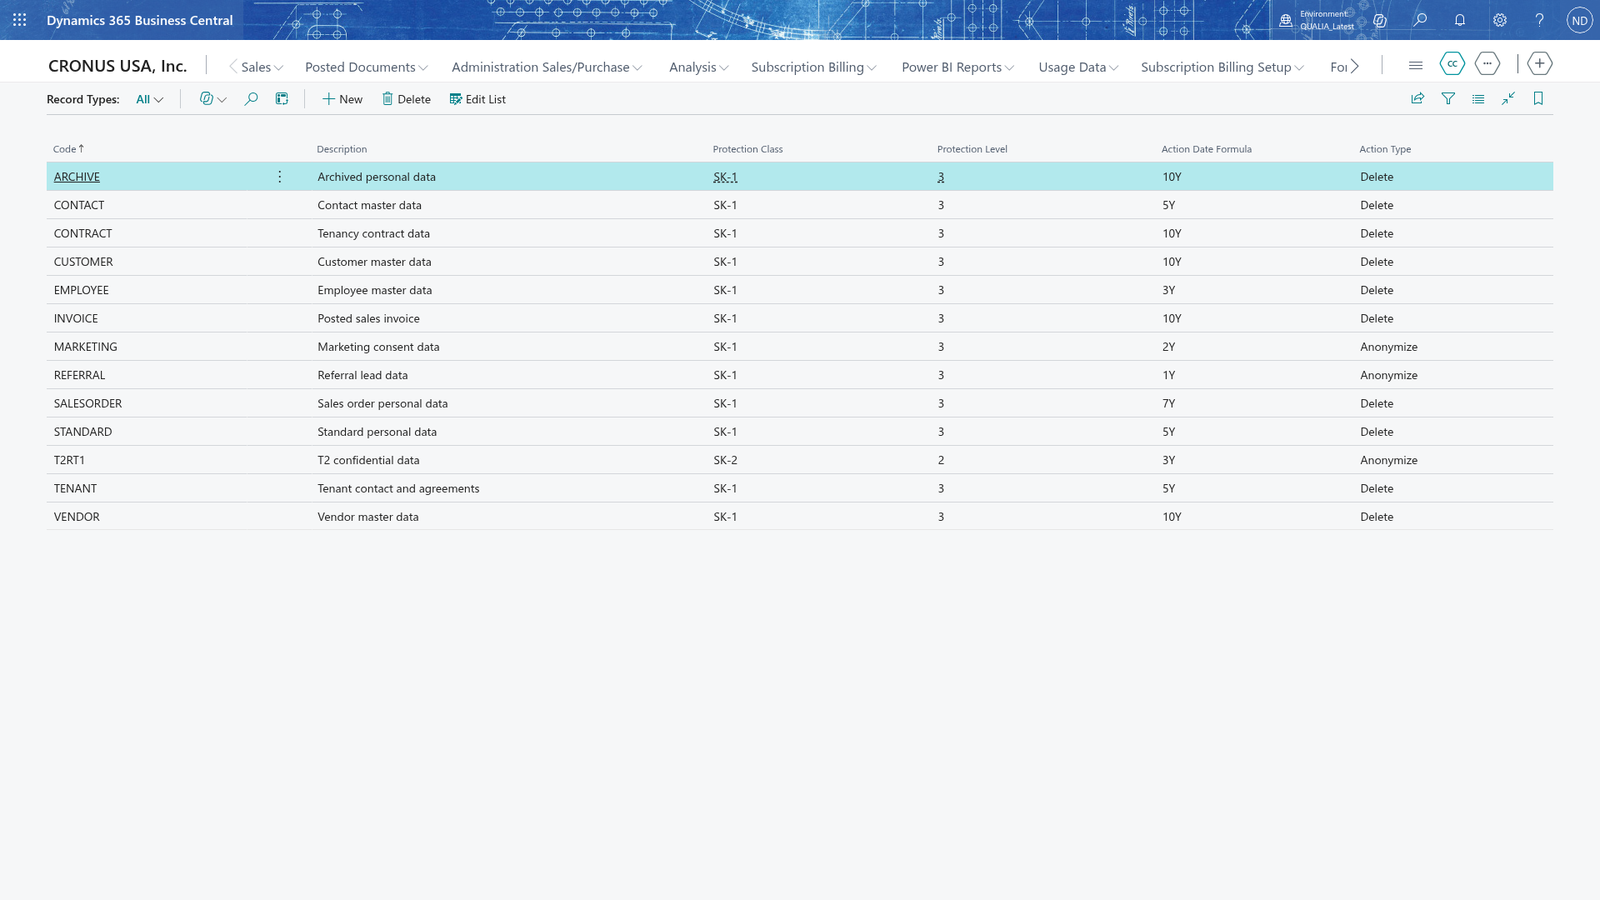
A record type is the template for a table guideline: it says which protection class and level the data belong to, how long they may be kept and what happens afterwards. Julia Beyer's classification of the tenants' data starts here.
- Choose Search, enter Protection Classes and choose the link.
- Choose New, enter SK-1 in Code and Normal need for internal data in Description.
- Add SK-2 with High demand for confidential data and SK-3 with Very high demand for particularly secret data the same way.
- Choose the line of class SK-1 and choose Protection Levels.
- Choose New, enter 3 in Code and Sensitive and confidential data and personal data subject to increased protection requirements in Description. The Protection Class Code of the new level is the class whose list you opened.
- Add the other levels of SK-1 (1, 2 and 4 to 7) the same way, with a Description that says how confidential the data are.
- Choose Search, enter Record Types and choose the link.
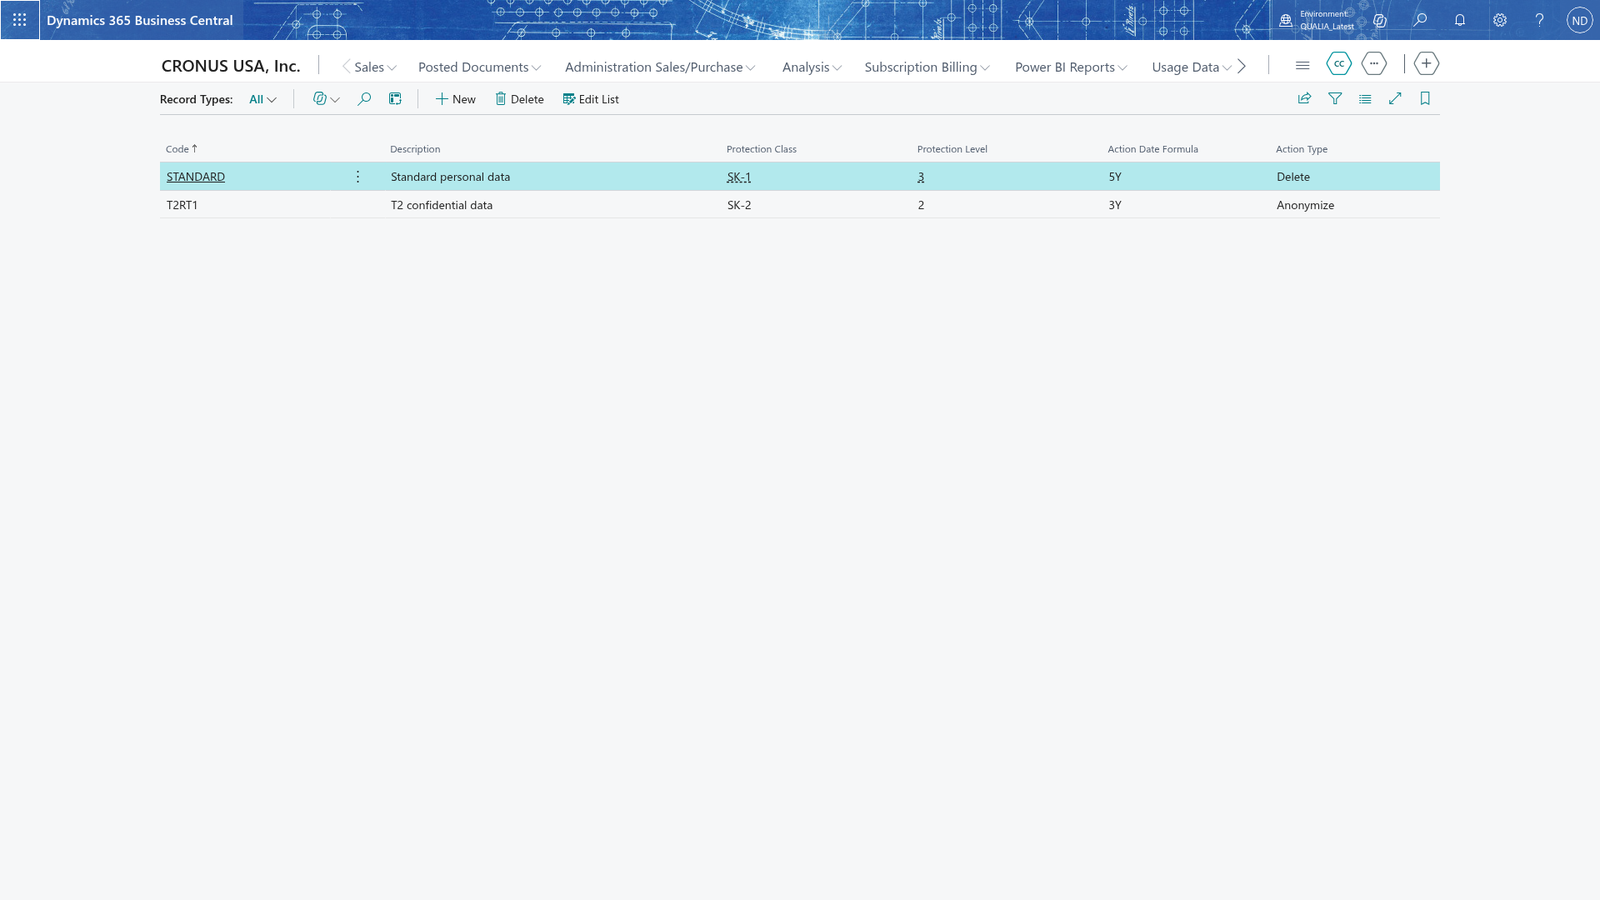
- Choose New, enter STANDARD in Code and Standard personal data in Description.
- Choose SK-1 as the protection class of the line; the lookup of the protection level then offers only the levels of SK-1, so choose 3.
- In Action Date Formula, enter 5Y.
- In Action Type, choose Delete. Move the cursor off the line.
A new table guideline copies the action date formula and action type of the record type you choose in it, and can override them for its own table; the guideline's values are what the app uses for the table's records. Later changes to the record type do not change the existing guidelines.
Note: A protection level belongs to one protection class and is looked up through the class, so the class must exist before you create levels inside it.
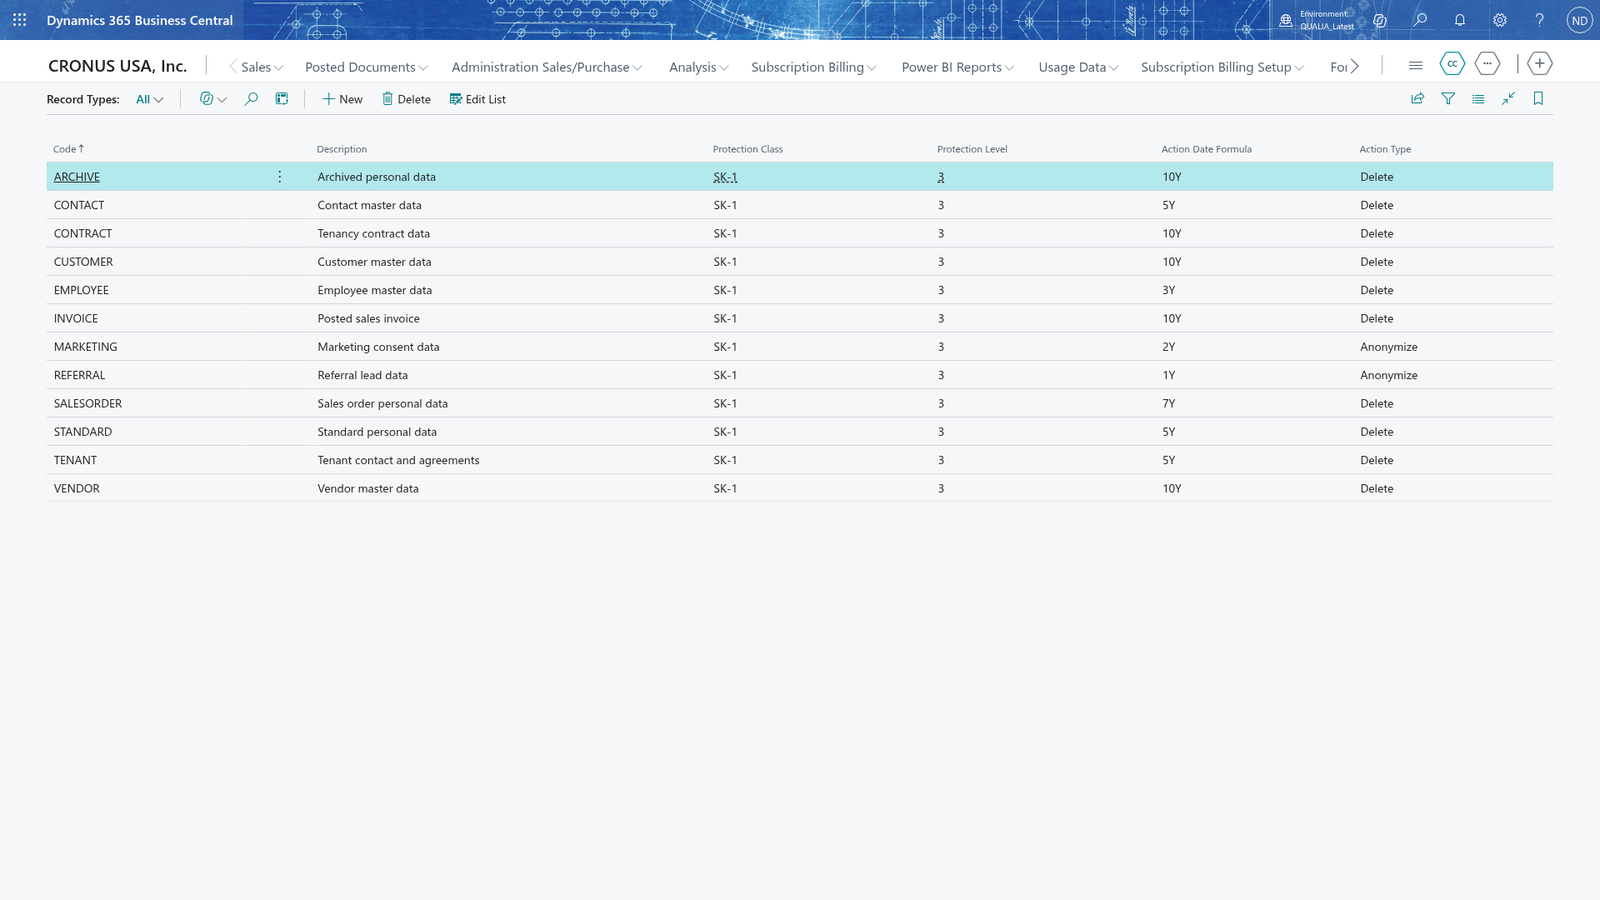
You can also classify a group of data that none of the classes SK-1 to SK-3 describes: add a new protection class in Protection Classes, give it its levels, and choose it as the protection class of a new record type, for example the class SK-9.
Give every table its own rule: the table guidelines
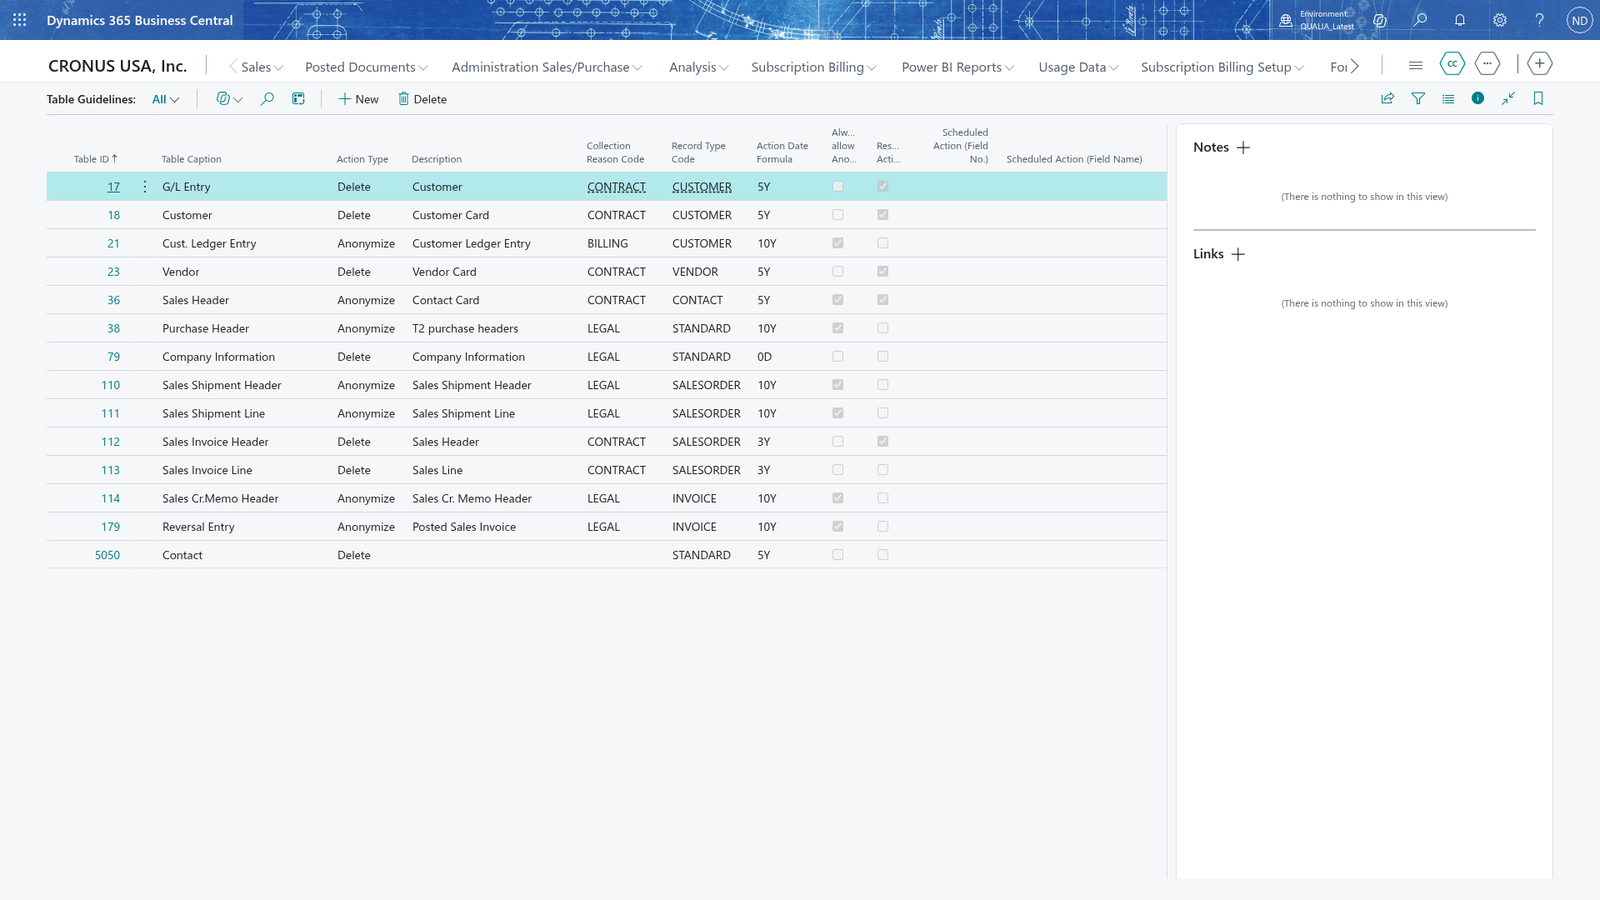
The table guideline is the heart of the classification: for one table it defines whether the data are deleted or anonymized and for how long they may be kept. From this moment on, the app creates scheduled action entries for the records of that table.
- Choose Search, enter Table Guidelines and choose the link.
- Choose New and choose Table ID - the table with personal data, for example Posted Sales Invoice.
- Choose the line in the Table Guidelines list to open the card Table Guideline.
- In Record Type Code, choose the record type, for example STANDARD. It is optional: a guideline can be created and deleted without one.
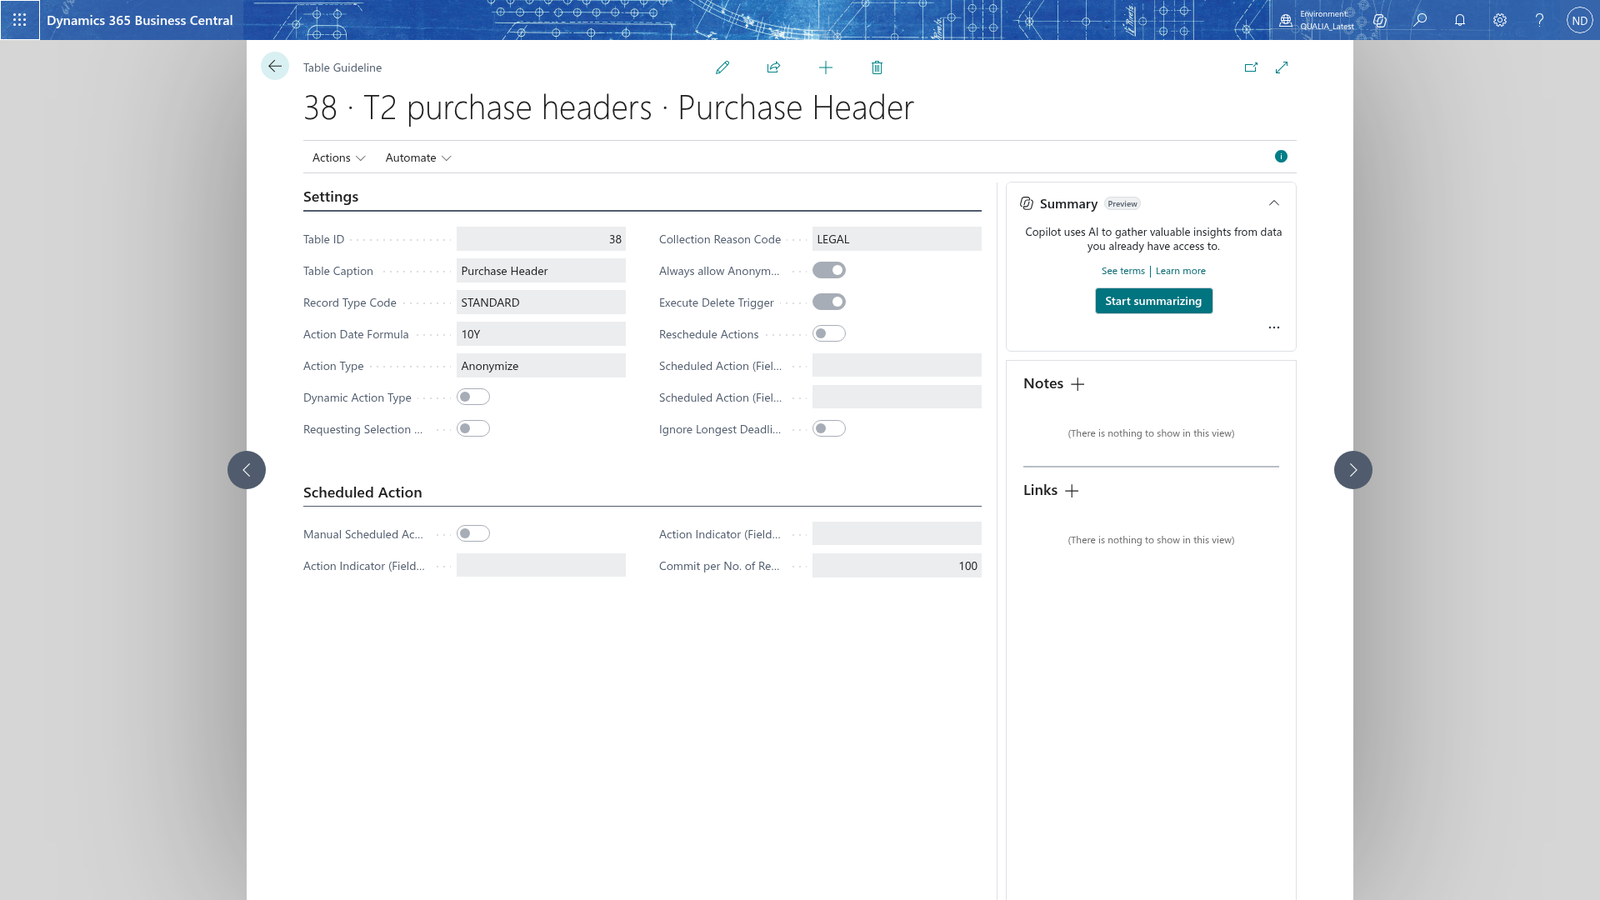
- In Action Date Formula, enter how long the data may be kept, for example 10Y.
- In Action Type, choose Anonymize.
- In Collection Reason Code, choose the legal reason that is the default for the data of this table, for example CONTRACT.
- In Scheduled Action (Field No.), choose the date field whose date starts the retention time, for example Posting Date of Posted Sales Invoice; Scheduled Action (Field Name) shows its name next to it.
- If the data must never be deleted in full, turn on Always allow Anonymization; if the delete trigger and the business logic of the table must run on deletion, turn on Execute Delete Trigger (new guidelines are preset with it).
- To let the job queue create the actions later for a large table, turn on Manual Scheduled Action.
- In Action Indicator (Field No.), choose the field of the table that shows how far the job queue has come.
- In Commit per No. of Records, enter how many records the job queue handles per transaction, for example 500.
- Move the cursor off the card. Back in the Table Guidelines list, the line shows the action type, the formula and the scheduled action field.
- Repeat for the other tables, at QUALIA Technik: Contact, Customer and Sales Header with action type Delete after 5Y; Requesting Selection Allowed for Contact so that Lena Hartmann can link a data subject to a contact; Dynamic Action Type for Sales Header so a Delete action can later be changed to Anonymize when a contact became a customer.
- On the card of the guideline for a table that uses the job queue, choose Update Details; in Table Guideline Details choose the line, choose Update Last No. with highest Value and confirm the question with Yes. Last Updated No. then shows the highest value of the table's manual scheduled action counter, which tells the job queue what it has not seen yet.
Note: The scheduled action date field must be a date field of the table, so Scheduled Action (Field No.) only offers the table's date fields; the app checks the field when you enter it, because the action date of every record is calculated from it.
Note: Action Indicator (Field No.) must be an integer field of the table that is part of an index, because the job queue reads it record by record.
Document the origin and the legal reason for the data
The setup lists make the work of Max Keller and Lena Hartmann comparable and complete, because they pick the same codes every time.
- Choose Search, enter Data Collection Reasons and choose the link.
- Choose New, enter CONTRACT in Code and Contract / tenancy in Description.
- Add LEGAL with Legal obligation and MARKETING with Marketing consent the same way. A table guideline uses one of these reasons as the default for the data records of its table.
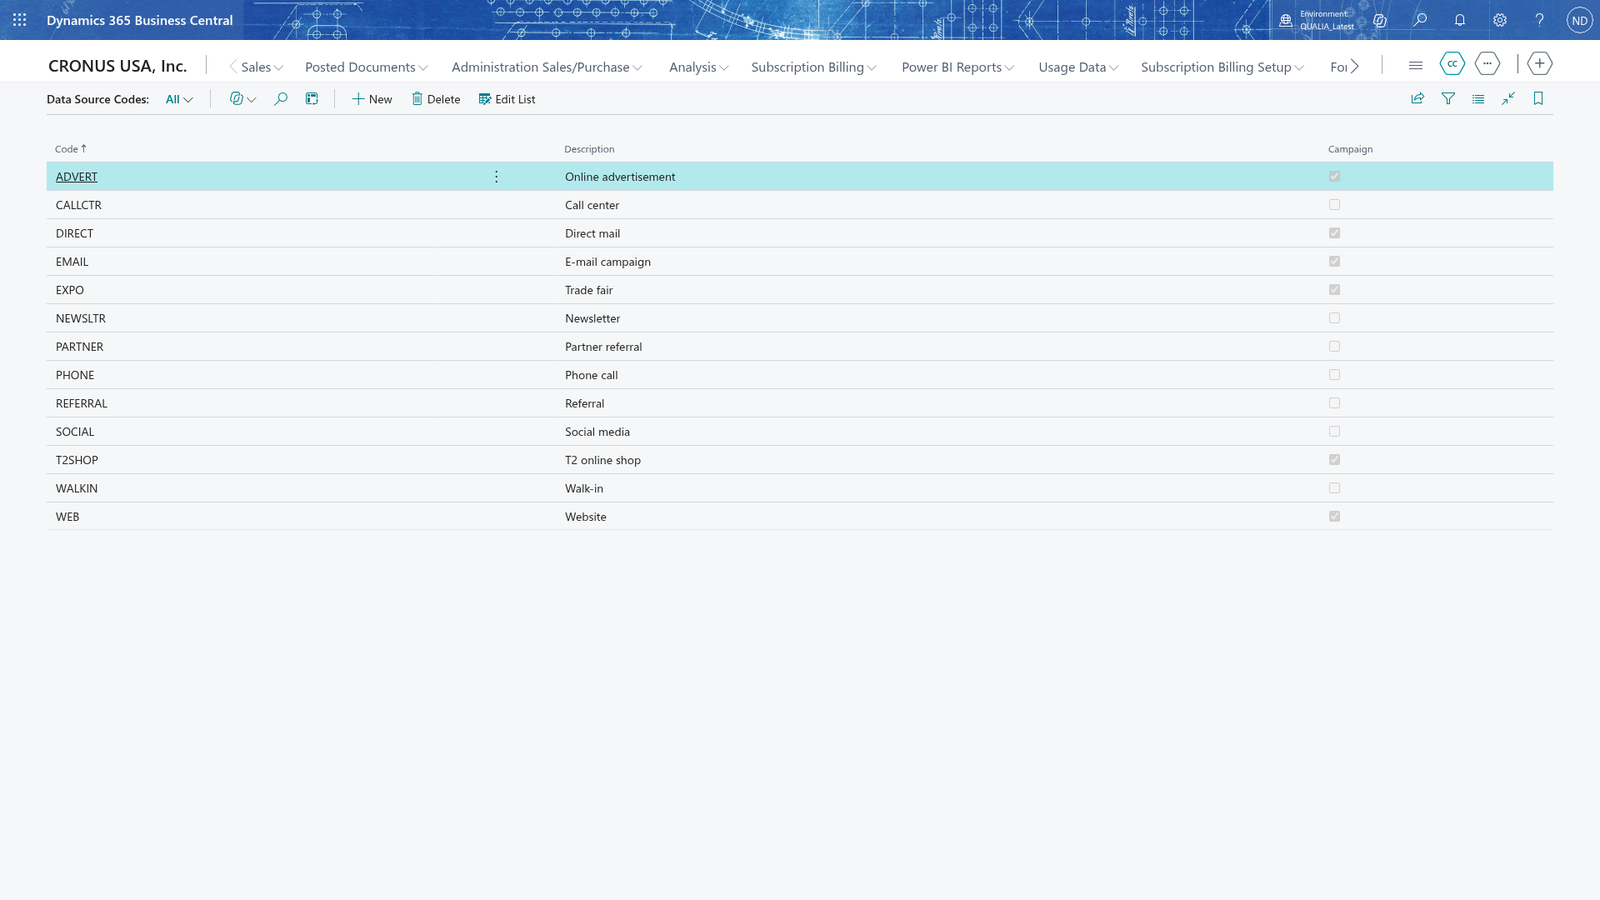
- Choose Search, enter Data Source Codes and choose the link.
- Choose New, enter WEB in Code, Website in Description and turn on Campaign.
- Add EXPO with Trade fair (also Campaign) and REFERRAL with Referral the same way. The Campaign flag shows the campaign field on the GDPR details, so Max Keller can record the campaign that produced the contact, for example Q3-2026.
- Choose Search, enter Verification Codes and choose the link.
- Choose New and add the codes PASSPORT, ID_CARD and VIDEOCALL with their descriptions. Lena Hartmann records one of them on each request to document how she checked that the requester is really the person who claims to be.
Note: Keep the codes short and upper case (for example CONTRACT, WEB, PASSPORT): users choose them from lookups, and a code that is already used on a GDPR detail or a request should stay in the list.
Keep the reasons for moving a scheduled action
A scheduled action that has not been executed yet can be moved to a new date, for example when a customer asks for more time. The reschedule reasons document each move; Lena Hartmann uses them in the scheduled actions list.
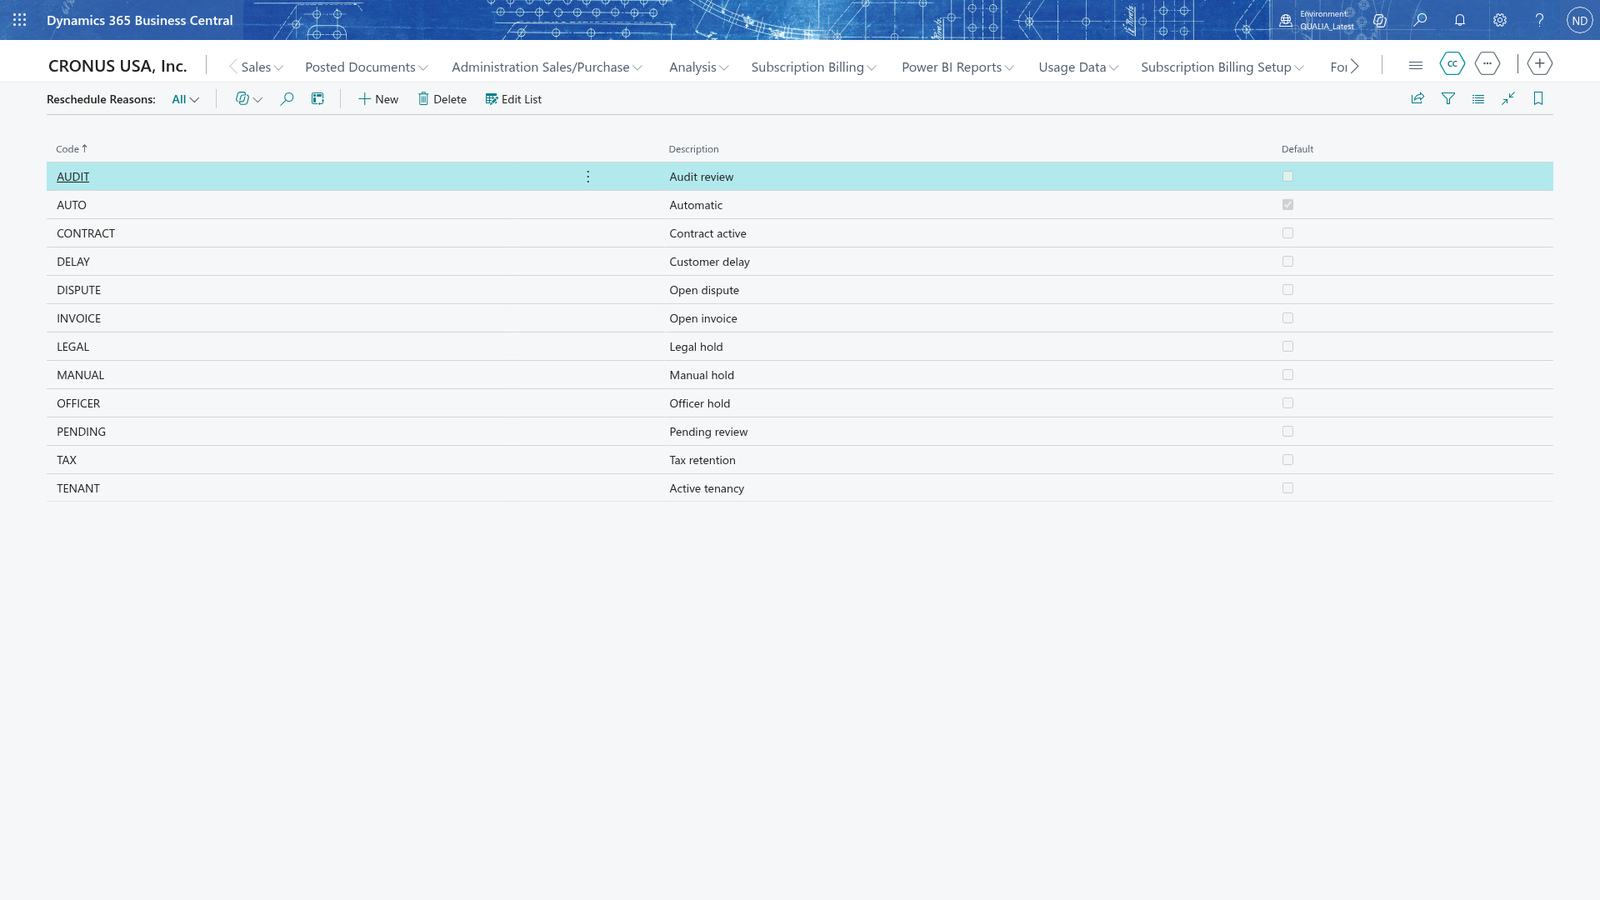
- Choose Search, enter Reschedule Reasons and choose the link.
- Choose New, enter AUTO in Code and turn on Default. This is the reason the app uses when it moves scheduled actions automatically.
- Choose New again, enter DELAY in Code and Customer delay in Description. Lena Hartmann chooses DELAY when she moves a scheduled action to a new date.
Note: Exactly one reschedule reason carries Default, because the automatic move of scheduled actions uses it when no reason is given.
Plan the processing purposes and the consents
Consents and processing purposes answer the question "When and in what form did the person give me consent?". A consent such as e-mail marketing carries the processing purposes it grants, and the app adds them to the contact as soon as Lena Hartmann documents the consent as given.
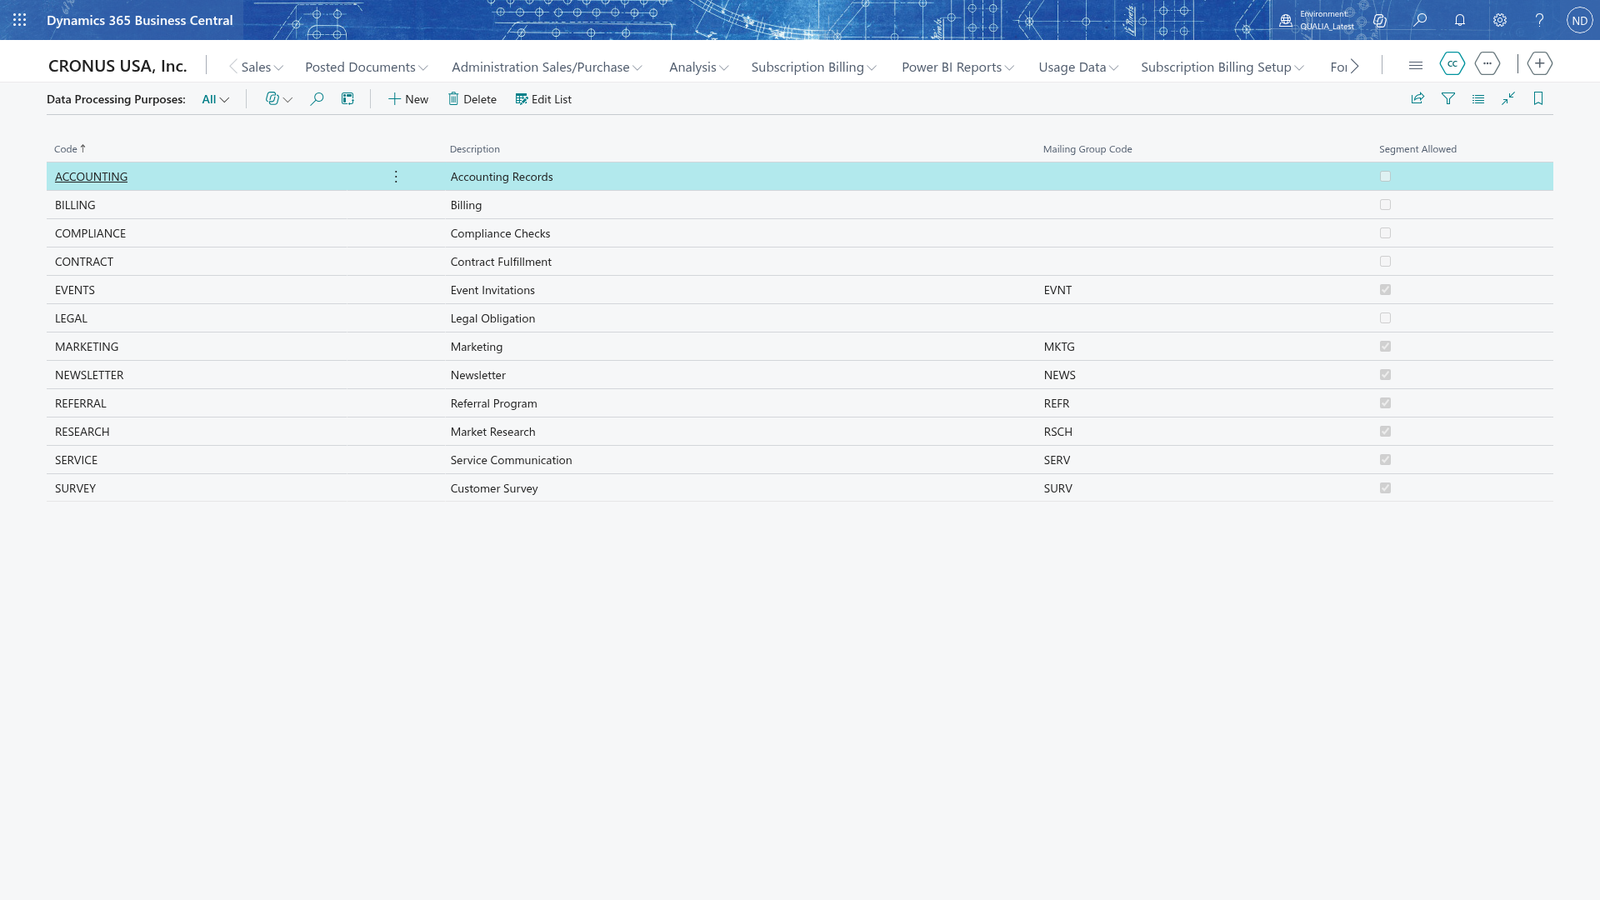
- Choose Search, enter Data Processing Purposes and choose the link.
- Choose New, enter NEWSLETTER in Code and Newsletter in Description.
- Turn on Segment Allowed so the contact's data may be used in marketing segments.
- If the contact should get a mailing group while the purpose is active, choose a Mailing Group Code.
- Add MARKETING with Marketing (also Segment Allowed) and BILLING with Billing the same way.
- Choose Search, enter Data Processing Consents and choose the link.
- Choose New, enter EMAIL in Code and E-mail marketing in Description, and add POST with Post and phone marketing the same way.
- Choose the line of the consent EMAIL and choose Process Purposes.
- Choose New, enter NEWSLETTER in Processing Purpose Code. The row is already linked to consent EMAIL.
- Add MARKETING the same way.
- Choose the line of POST and choose Process Purposes.
- Choose New and enter BILLING in Processing Purpose Code.
Note: Segment Allowed means that a contact with this purpose may be used in marketing segments; the Mailing Group Code of the purpose is set on the contact while the purpose is active.
Note: A purpose granted by a consent is added to the master data record when the consent is documented and removed when the consent is revoked, so the contact's purposes always match the consents Lena Hartmann documented. A purpose that two consents granted is removed only when the last of them is revoked.
Example: Julia Beyer configures QUALIA Technik
QUALIA Technik GmbH manages properties for institutional investors: 45 employees and 260 tenancy agreements in Business Central. The salespeople record tenants such as Tanja Weiss (contact 1000) and their company Mietwerke Berlin GmbH (customer 2000). Julia Beyer starts with the classification: SK-1 "Normal need for internal data" with levels 1 to 7, then record type STANDARD: protection class SK-1, protection level 3, Action Date Formula 5Y, Action Type Delete.
Then the table guidelines, all with Record Type Code STANDARD:
| Table | Action Type | Formula | Special settings |
|---|---|---|---|
| Contact | Delete | 5Y | Requesting Selection Allowed = yes |
| Customer | Delete | 5Y | |
| Sales Header | Delete | 5Y | Dynamic Action Type = yes |
| Posted Sales Invoice | Anonymize | 10Y | Collection Reason Code CONTRACT, Scheduled Action (Field No.) Posting Date, Always allow Anonymization = yes, Execute Delete Trigger = yes, Manual Scheduled Action = yes with the action indicator field, Commit per No. of Records 500 |
Then the setup lists: collection reasons CONTRACT, LEGAL, MARKETING; data source codes WEB, EXPO (both Campaign) and REFERRAL; verification codes PASSPORT, ID_CARD, VIDEOCALL; reschedule reasons AUTO (Default) and DELAY; purposes NEWSLETTER and MARKETING (Segment Allowed) and BILLING; consents EMAIL and POST with their process purposes.
The result: Max Keller creates contact Tanja Weiss (1000) and customer Mietwerke Berlin GmbH (2000). The app gives the contact and the customer a scheduled action entry with action Delete and action date 2029-06-12, because Contact and Customer are deleted after 5Y. The old invoice SINV0001 of Mietwerke Berlin (posting date 2018-11-30) gets an Anonymize entry with action date 2028-11-30 = 2018-11-30 + 10 years. When Lena Hartmann later documents Tanja's consent EMAIL on the contact, the purposes NEWSLETTER and MARKETING are added to Tanja Weiss; when she revokes POST again, BILLING disappears from Tanja Weiss. A purpose that two consents grant disappears only when the last of them is revoked.
What happens
- The master data change no business record: the app reads them when it creates scheduled actions and when users enter GDPR details.
- From now on, every record that is created in a table with a guideline gets a scheduled action entry with the action type and the action date of the guideline; the date comes from the scheduled action date field plus the action date formula.
- The codes of the setup lists appear in the GDPR details, the consents and the requests, so several people record the same situation the same way.
- You can check the rules on the Table Guidelines list: action type, record type code, action date formula, collection reason, Always allow Anonymization, Reschedule Actions and the scheduled action field per table.
- To change a rule, open the line on the Table Guidelines list and edit the card Table Guideline; to start over with a table, delete the guideline line and create it again.
If something goes wrong
- "Protection class SK-9 does not exist. Create the protection class before you define levels inside it." - You entered a class code that is not in Protection Classes. Create the class there first, then define its levels.
- "Table <n> has no field <n> with the data type Date. Select a date field of the table as the scheduled action date field." - The scheduled action date field must be a date field of the guideline's table. Open Scheduled Action (Field No.) and choose a date field, for example Posting Date.
- "Field <n> of table <n> is not part of an index. In the development environment, add the field to an index of the table first." - The action indicator field (or the scheduled action date field) is not indexed, so the job queue cannot read it quickly. Choose another field or add the field to an index.
- "You cannot clear the scheduled action date field of table <n> while Reschedule Actions is activated. Turn off Reschedule Actions first." - The records of the table may already have scheduled actions that must be cleaned up. Turn off Reschedule Actions on the card, move the cursor off the card, and then clear Scheduled Action (Field No.).
- To change which table a guideline belongs to, delete the line on the Table Guidelines list and create it again for the right table.